Initial assembly takes around 1 hour and only needs to be done once.
Watch the Initial Assembly video below which walks you through step by step.
Fast Access Manta5 Digital Manuals:
COMMON INITIAL ASSEMBLY MISTAKES
- AVOID OVER-TIGHTENING OF REAR FOIL SHOE: Over-tightening of the rear foil shoe will damage your carbon fibre hydrofoils. If you do over-tighten this will affect the overall integrity of the wings. 5 Nm is the recommended torque value for assembly.
-
Front buoyancy not inserting under the battery tray: try angling the buoyancy into the battery tray rather than going straight up and in. Once you have the rear end successfully inserted, squeeze the front of the buoyancy down and slide it into the battery tray lip to secure in place.
-
Mini-tiller not having much movement: make sure to not over tighten the mini tiller as whilst this needs to be tight, it should not be so tight that the skid plate can’t move freely and assist you to self-level over chop and swell as you foil. It should have 10mm - 15mm of movement. Watch the video below for the correct amount of movement that your mini-tiller should have.
-
Unscrewing the battery tray grub screws fully: screwing these out fully means that you will need to re-screw starting from inside the battery tray and screwing them outwards. Doing it from the outside-in can cause threading of the battery tray screw holes.

-
Handlebars look like bull horns: handlebars need to be rotated so that the crests of the bar face directly upwards allowing the handlebars to be in the ideal positioning for riding.
| Incorrect | Correct |
 |
 |
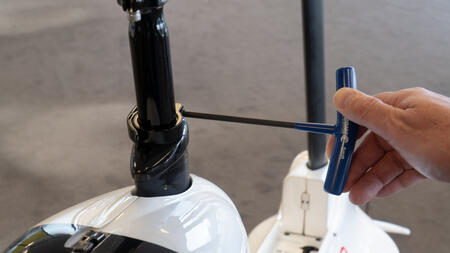
- Seat post not tight enough: fasten the seat post clamp by inserting a 3 mm hex key (allen key) into the seat post clamp to tighten this. Tightening the clamp using this method will help increase the longevity of your clamp by not turning the clamp to tighten in the seat post reducing wear and tear.
-
Not securing the pedals onto the cracks properly: take care to tighten the pedals well as these being too loose could see you losing them to the water whilst riding. Use a long allen key in order to get sufficient torque to safely secure (30 Nm). You can also use a 15 mm spanner across the flats of the pedals to secure further.
- Ensure that the eBike Remote mount is correctly positioned: By mounting the eBike Remote in the correct location on the handlebars this will allow you to easily rotate your hydrofoil bike between being upside down and right up whilst limiting any potential damage to the eBike Remote mount.
| Incorrect | Correct |
 |
 |
| Incorrect | Correct |
 |
 |