Start from a stationary position in deep water. This technique is the most challenging to master
OVERVIEW
Firstly, ensure the body of water you are in is deep enough to perform this move. This will ensure your foil has adequate room to rotate to an upright position.

 |
IMPORTANT: Leave the battery off and do not attempt to launch until the step 5.
|
Step 1 of 7: Establishing your preferred side

Start off by establishing which side you would prefer to rotate the bike to its upright position. We have found most riders prefer to use their dominant side to rotate the bike to the sub-launch position. For example, if you are right footed, then you want the bike laying on its left side.
If the bike is capsized on the opposite side begin by flipping it around to your preferred launch side. The easiest way to do it is by grabbing the handlebars as shown in the video. Alternatively, you can flip it by pushing the seat - which is closer to where you'll be positioned, but requires more strength.
This tutorial is written for right-handed people. If you are left-handed, please just consider the opposite for hands and feet positions. |
HINT: This training exercise might be easier by lowering your seat all the way down. |
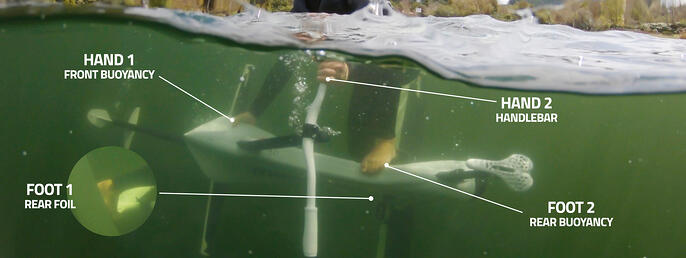
Step 2 of 7: Mount and submerge the Hydrofoiler underneath you
From a stationary position, move to the back of the bike and rotate the crank to 6 o'clock. Don't forget this step, it makes mounting the bike a lot less difficult later.


 |
If the bike is tipping one way or the other then you need to shift your hands, or body position to correct this. It helps to have you arms stretched out as strait as possible.
|
|
HINT: Some people might find it more comfortable to hold the frame with their left hand instead of the handlebar.
|
|
IMPORTANT: Get familiar with the balance of your bike whilst in this position. The longer you can maintain this position the more muscle memory you build. Hold the bike underneath you horizontally before rotating to an upright position.
You're ready to move on when you can stay here for at least 30 seconds.
|
Step 3 of 7: Flipping the bike to the upright position

When first learning this step, take your time to get used to the feeling of sitting on the bike while stationary.
Some tips:
- Use the handlebar and pedals to orientate your bike if falling forward or back. The front nose of the bike will want to come up more so than the back. Sometimes you can recover by paddling forward with your hands, and trying to get as much weight over the front of the bike.
- Rock the handlebars as far forward and underneath you – try to keep your elbows as straight as possible. The shorter you are, the more important it is;
 |
IMPORTANT: Do not rush to launch right away. Sit tight and get a feel for the balance of the bike underneath you.
You're ready to move on when you can stay here for at least 90 seconds.
|
 Now that you have the bike well balanced and the muscle memory built, turn on the battery and ride the bike completely underwater, to get a feel for how it moves.
 |
IMPORTANT: Ride with the bike completely submerged. Get a feel for the balance. Do not try to launch just yet.
You're ready to move on when you can ride for at least 90 seconds while underwater.
|
Step 6 of 7: Starting the launch

|
IMPORTANT: Make sure the bike is flat before starting, do not attempt to launch at an angle.
|
|
HINT: Recovery from a stall - ease off pedal so you can re-attempt without falling off completely
|
Step 7 of 7: Taking off

|
IMPORTANT: If that mini tiller comes up too sharply you will stall. Shake the handlebars to get the tiller in the right position/lift the nose out if needed .
|
|
HINTS: Just like an aircraft launches from a runway, the same dynamics (loosely) apply here. If you feel you are coming up too steep, slow your pedalling down and push the nose down mid launch or move your weight further forward.
|
The complete steps in motion

SUCCESS

Common Mistakes

- Launching with a steep pitch. The steeper the bike is angled out of the water, the more power that is required to launch the bike (meaning the rider needs to pedal much harder than they need to)
- Attempting to recover a stall. Once the bike gets too steep it can be better to start again instead of wasting lots of energy.
-
Not putting enough weight forward. It is very hard to go over the front once you are moving under the water.
-
The front tiller doesn’t come up when it should. If the bike doesn’t want to come up at all, regardless of how hard you pedal, then there is a chance that the mini tiller is directed downwards, when it should be up. To set the mini tiller in the upwards direction you can try pulsing the front of the bike (with the handlebars), or simply start the launch again. Most of the time the mini tiller will sit in the correct position at the start of the launch.
Submerged Launch Takeaways
-
Keep your weight over the front of the bike to avoid lifting too quickly and losing power.
-
Balance is the key: get used to manoeuvring the bike to stay balanced.
-
Launch out of the water at the right angle of attack (not too steep, not too shallow) 10 degrees is the target.
-
Your runway can never be too long as long as your pedal speed is consistent. A gradual takeoff trumps a steep takeoff every time.
- Do not rush these steps. Take your time. You will have more success if you do.