In this section we will guide you through how to transport and assemble your bike at the shoreline.
Transport
Loading and unloading your Vehicle
The Hydrofoiler breaks down into 3 main parts for in-car transportation
-
The main body of the bike
-
Rear foil
-
Front tiller assembly

Before transporting the bike in the back of your car, make sure to remove the rear foil and front tiller assembly. Once these parts are removed we recommend the following transportation configuration based on the type of car your using:

Before you leave remember to take all your Hydrofoiler parts and assembly tools:
-
Towel or a mat
-
Toolbox
-
Main Frame
-
Rear Foil
-
Propeller & Nose Cone
-
Front tiller
-
Battery
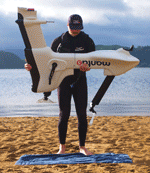
Waterside Hydrofoiler Setup
Setting up your Hydrofoiler pre-ride is a quick and easy process.
Once you have selected an appropriate area* to launch from and have all key components of your Hydrofoiler XE-1 to the shoreline you are ready to assemble your bike.

If the area where you’re assembling the bike is not grassy or soft, put down your towel/ mat and then place your Hydrofoiler upside down.
 |
ATTENTION: Your bike is more unstable whilst upside down, so take care that any strong winds don’t topple your bike and damage it.
|
Step 1. Attach Rear Foil

-
-
Starting with the rear foil. Grab a 6 mm Allen key and slide the foil into the bayonet shoe until it will go no further.
-
Use the Allen key to tighten the rear foil into the shoe, apply light pressure through the Allan key to begin threading the bolt.
-
When finger tight, use the longer end of your allen key to give it one last quarter turn.
-
Ensure your rear foil is now fitted securely into the bayonet shoe, with no play
-
Step 2. Attach Front Tiller Section

-
-
For the front tiller, begin by unscrewing the fastening bolt.
-
Keep the bolt in a safe place, ready to install with the tiller.
-
Ensure the bushings are not dislodged when the bolt is not in place.
-
Next, pick up your front tiller and position into place, ensure the two bushings sit either side of the bearing.
-
-
Using a 5 mm Allen key, secure the front tiller in place to the main bike frame using the bolt. Be careful not to over tighten.
 HINT: If the bike seems unsteady place your foot down on the handlebar to help keep your bike upright.
Step 3. Rotate your bike

-
Rotate the bike to the upright position. To do this, stand at the front of the bike, crouching down, place your dominant hand on the head tube and the other on the handlebar grip.
-
Begin lifting the bike upward rotating it forward, and place your foot behind the seat to ensure the bike does not slip.
-
Move your dominant hand from the frame to the other grip as the bike becomes upright.
-
Once facing vertically slowly and carefully let the bike drop forwards taking care to not scratch the rear foil, or buoyancy module, on abrasive surfaces.
-
Where possible avoid rocks, or sharp objects coming into contact with your foils.
-
Step forward over the rear foil, holding the handlebars and pause once the bike is perpendicular to the ground.
-
Ensure the front tiller section is not touching the ground. Using your foot, push the front foil so that it is flat to the surface and place gently down on the ground.
-
The mini tiller should not be touching the ground at all and both foils should be resting flat to the ground.
ATTENTION: All of our carbon fibre foils have a special gel coating to protect them from the elements, but they are still a delicate component. Taking care with your foils will increase the longevity of your product.Step 4. Attach Propeller and Battery

-
Once upright you will need to attach the propeller. Make sure you have the following parts to hand:
- hex block
- nose cone piece
- propeller
- 17 mm spanner
-
We recommend always attaching your battery last, but if your battery is already connected make sure it is switched off.
-
Take extra care when handling the propeller.
-
Unscrew the nut and washer. Grab the hex block and place it into the propeller. Keep the hex block wedged inside the propeller where it naturally sits, this makes for safekeeping and easy storage.
-
Now attach this onto the drive shaft, slide the washer back on and secure this by tightening the nut clockwise with the 17 mm spanner.
-
Finally add on the nose cone by screwing it clockwise.
-
Start off by inspecting the battery tray to make sure it is dry and free from debris.
-
Making sure that the battery is inserted and attached properly is critical for your safety and your foiling experience. To do this, pick up your battery and connect it to the cable in the battery tray.
-
You will hear a small click sound as you clip them together. Make sure that you cannot see the small red dot on the connector - if you can’t, it is properly connected.
-
Once connected insert the battery into the tray. Tilt the battery to around 45 degrees and slide in from the left hand side. The battery should slip down into the recess.
-
Next, roll the battery forwards to secure your battery into the tray.
-
Using a 4mm Allan key gently tighten the grub screws into the locking recess.
-
Ensure the screws are sitting close to the battery housing.
-
Once you’ve tightened in the grub screws, place one hand on the battery and move it side to side. There should be a minimal amount of play. This is in order to ensure that your grub screws are not over tightened as this can damage the battery housing if over tightened.
-
With the battery off, turn the pedals a full two rotations and feel the resistance as they turn.
-
Next, turn the battery on. Listen out for a loud beep and a solid ring of light around the button.
-
With the battery on, check the electrical assist is working by turning the pedals again. After your pedals turn 180 degrees the motor should engage, making the cranks easier to rotate, whilst the propeller spins faster.
ATTENTION: Failure to properly maintain the battery connectors can result in battery malfunction and keep you from foiling.ATTENTION: The final part of your assembly should always be your battery. If you are not foiling ensure your battery is switched off to prevent injury.
-
Step 5. Pair your GARMIN® eBike Remote

The first time you connect the GARMIN® eBike with your Hydrofoiler, you must pair it to your XE-1 battery (if you have already paired your eBike Remote simply press a key in order to wake it back up).
-
- The battery must be out of the water in order to pair successfully.
- Bring the remote within 1 m (3 ft.) of the Hydrofoiler and HydroCell battery.
- Turn on the battery.
- On the GARMIN® eBike remote, hold two keys simultaneously until the LED starts alternating green and red, and release the keys.
- The remote will search for your Hydrofoiler XE-1. Once the LED flashes green 6 times, pairing is complete and successful.
- Once paired, the GARMIN® eBike Remote connects to your XE-1 whenever it is in range and turned on. You may need to wake the remote by selecting any key.
|
NOTE: You must stay 10 m (33 ft.) away from other ANT+’” sensors while pairing.
|
Step 6. Pre-flight final Check
 The forces that the bike will endure throughout your foiling experience are high and it is your responsibility to properly assess if the bolts are tensioned correctly.
We recommend performing a close inspection to your main contact points, such as cranks, pedals, stem and seat clamp.
Key Takeaways
-
Take extra care when plugging the battery in as the data cable uses sensitive electrical contacts to relay critical information to your electronics box. It’s important to keep this clean and free of debris and water. Damaging this port can permanently ruin your battery, so ensure care is taken.
-
Watch for wind gusts. If your bike is upside down mid assembly keep foot on the handlebars to protect it from blowing over.